

Shop Ready Earring Stack Ideas: Three Piece Starter Recipe
A great earring stack is not a collection, it’s a composition: one anchor piece at the lobe, smaller pieces cascading upward, and a metal tone that ties it together. The easiest place to start is a three-piece stack: a gold stud or small huggie at your first lobe, a slightly smaller huggie at the second, and a tiny flat-back stud at the cartilage. Keep the hardware lightweight and comfortable before you chase more pieces.
TL;DR:
- Keeping pieces proportionate and following the gradient rule is essential, with the largest anchor at the first lobe and smaller pieces above.
- A cohesive metal tone, typically gold, helps unify the stack, with sparing use of contrasting metals to maintain harmony.
- Avoid overcrowding by leaving visible skin space between earrings and adjusting sizes to match your ear shape and piercings’ natural contours.
- Build your ear stack gradually, adding one piece every two to three months, and ensure each new addition fits the scale before placing it.
- Flat-back labrets and solid metals like gold or titanium are recommended for comfort, durability, and to prevent irritation during daily wear.
Table of Contents
- Core Styling Principles Behind Every Good Earring Stack
- Minimal Curated Ear Ideas You Can Copy Today
- The Balanced Trio: A Fail-Safe Starter Stack
- Statement Conch Centerpiece for a Bolder Look
- Soft Stacked Lobe Looks for a Layered Effect
- Cartilage-Forward Stacks: What Works and What to Watch
- Practical Hardware: Backs, Metals, Sizes, and Care
- Building Your Stack Over Time: A Phased Plan
- Considering Ear Shape and Piercing Placement
- Styling Earrings for Different Occasions
- What I’ve Learned Building My Own Ear Stack
- Where to Find Curated Starter Pieces
- Sources
- FAQ
Core Styling Principles Behind Every Good Earring Stack
Every stack that looks intentional follows the same logic, whether it’s two pieces or six. The anchor piece, your largest or most eye-catching earring, sits at the first lobe because that’s where the eye lands first. Everything above it should get progressively smaller and lighter. Stylists call this the cascade or gradient rule, and it’s the single biggest reason some stacks look styled while others look accidental.
From there, the rule of three does a lot of heavy lifting. Two pieces reads as minimal, three reads as curated, and four or five only works once you’ve mastered scale. Metal choice matters just as much as placement. A single metal tone, usually gold, reads as cohesive across mixed textures and shapes, while intentional mixing (a silver hoop against a gold stud, say) only works when the rest of the stack is simple enough to support the contrast. Negative space finishes the job: leave a visible sliver of skin between pieces so the eye can separate one earring from the next instead of seeing a cluttered blur.
- Anchor at the first lobe, always the largest or boldest piece
- Cascade upward in size, never sideways in randomness
- Pick one metal tone as your base, then mix sparingly if at all
- Leave breathing room between pieces so the stack reads as composed
Pro Tip: Before adding a new piece, hold it up to your ear in a mirror and check whether it’s smaller than the piece below it. If it’s the same size or bigger, it breaks the gradient.
Minimal Curated Ear Ideas You Can Copy Today
Minimalism isn’t about having fewer opinions, but about restraint in scale. Tiny studs around 3 to 5mm are the backbone of almost every clean minimalist ear.
- Double lobe plus tiny helix: a 5mm stud at the first lobe, a 3mm stud at the second, and a 1.5mm micro-stud at the helix.
- Single lobe, tiny hoop, micro stud: an 8 to 10mm huggie at the lobe, paired with a 1.5 to 2mm stud higher on the ear for a quiet finishing touch.
- All-stud minimal stack: three graduated studs, largest at the lobe, in one metal tone, no cartilage piece at all.
Negative space and consistent metal are what separate “minimal” from “sparse and mismatched.”
The Balanced Trio: A Fail-Safe Starter Stack
This is the stack to build first if you’re stacking earrings for the first time. Three pieces, three placements, one clear hierarchy.
- First lobe: a huggie or medium stud, 6 to 10mm, in your chosen metal
- Second lobe: a smaller stud or thin huggie, roughly 4 to 6mm
- Cartilage (helix or lobe-adjacent flat): a flat-back stud, 2 to 3mm
Scale the whole trio up slightly for larger ears or down for smaller ones, but keep the ratio between pieces intact. Swap the base for a hoop, a stud, or a huggie depending on whether you want something sleeker or more textured.
Statement Conch Centerpiece for a Bolder Look
A conch piercing gives you a bigger canvas, and a bolder centerpiece there can carry the whole ear. A conch hoop between 8 and 12mm or a flat conch stud around 6 to 8mm works as the visual anchor instead of the lobe.
- Balance the conch with two simple lobe studs, not a busy double-lobe stack, so nothing competes for attention
- Add a forward helix stud for a little lift between the lobe and the conch
- Keep everything else smaller in scale so the conch stays the obvious focal point
- Save hoops for daytime and switch to a subtler stud version for dressier or evening looks
Soft Stacked Lobe Looks for a Layered Effect
Not every layered look requires cartilage piercings at all. If you have multiple lobe piercings, spacing does the same job the gradient rule does elsewhere on the ear.
- Space each lobe piercing evenly, roughly 3 to 4mm apart, so pieces don’t visually merge into one blob
- Mix a small hoop at the lowest lobe, a huggie in the middle, and a stud at the top for movement without cartilage
- Keep the top piece noticeably smaller than the bottom two, or the layers stop reading as separate
- Stick to one metal tone across all three lobes to keep the eye moving smoothly upward
Cartilage-Forward Stacks: What Works and What to Watch
Cartilage placements (flat, helix, conch, rook) give a stack real edge, but they come with real limits on weight and healing.
- Flat-back labrets are the standard for cartilage; they sit flush and won’t dig in while you sleep
- Tiny wire hoops, under 8mm, work for helix and rook without adding bulk
- Keep cartilage studs under 3mm in size until the piercing is fully healed
- Never get more than one new cartilage piercing in a single session; healing takes longer and hurts more when you stack fresh piercings on top of each other
Pro Tip: If a cartilage piercing is still healing, resist the urge to add a second one nearby. Wait until the first one has fully settled, usually several months, before introducing new hardware next to it.
Practical Hardware: Backs, Metals, Sizes, and Care
The hardware you choose changes how the stack feels day to day, not just how it looks. Flat-back labrets are the better choice for cartilage and for anyone who sleeps on their side, since traditional butterfly backs tend to press and irritate over hours of wear.
- Swap butterfly backs for flat-backs on any piece you wear overnight or through a full workday
- Choose solid 14K or 18K gold, or titanium if your skin reacts to base metals; plated pieces wear off quickly and can dull a minimalist look fast
- Follow the gradient in diameter too: an 8 to 10mm hoop at the lobe, tapering down to 1 to 1.5mm micro-studs at the upper cartilage
- Clean posts and backs with saline or a mild solution weekly, and remove hoops before workouts or swimming to avoid snagging
Solid metal costs more upfront, but it holds its color and shape through years of daily wear, which matters more on a stack you’re not planning to take off often.
Building Your Stack Over Time: A Phased Plan
A curated ear is built in stages, not assembled in one shopping trip.
- Start with your anchor piece and live with it alone for a few weeks before adding anything else
- Add one new piece every two to three months, giving lobes time to settle and cartilage extra time to heal fully
- Every few months, do a quick audit: try Coco Chanel’s old edit rule and remove one piece if the stack feels busy
- If a new piercing needs precise placement to sit level with existing pieces, get it marked by a professional piercer rather than guessing at symmetry yourself
Rushing this process is the most common reason stacks end up overcrowded instead of curated.
Considering Ear Shape and Piercing Placement
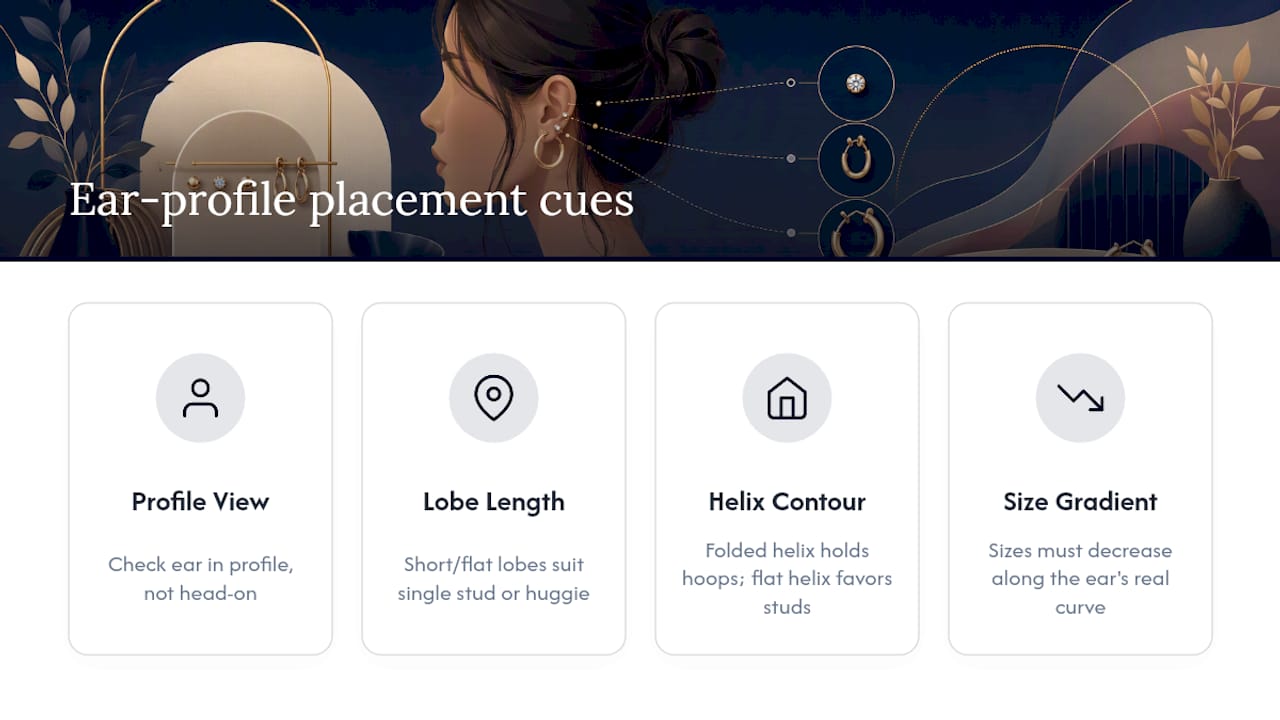
Ear shape changes how much room you actually have to work with, and ignoring it is why some stacks that look great on Pinterest fall flat in real life. A smaller or flatter lobe carries a single medium stud or huggie better than two competing pieces crammed together. A longer lobe has room for a double-lobe stack without crowding. If your helix sits close to your lobe, skip a third cartilage piece there entirely. It’ll visually collide with what’s already below it.
Ear shape also affects which placements sit flush versus which stand off the ear. A more folded or prominent helix takes a hoop beautifully, since there’s enough cartilage fold to hold the shape. A flatter helix often looks cleaner with a flat stud instead, since a hoop there can look like it’s floating. Rook and conch placements depend heavily on your ear’s natural contours. Some ears simply don’t have enough of an inward curve for a rook piercing to sit comfortably.
Before adding a new piece, look at your ear in profile, not just head on. The gradient rule only works if the sizes actually decrease as they move up your ear’s real curve, not an imagined straight line. If your cartilage curves inward sharply, a piece that looked proportionate on a flatter reference ear might look oversized on yours. When in doubt, ask a piercer to mark placement rather than guessing.
Styling Earrings for Different Occasions
The same stack doesn’t have to work for a Tuesday commute and a Saturday wedding, and trying to make one setup do everything usually means it does neither well.
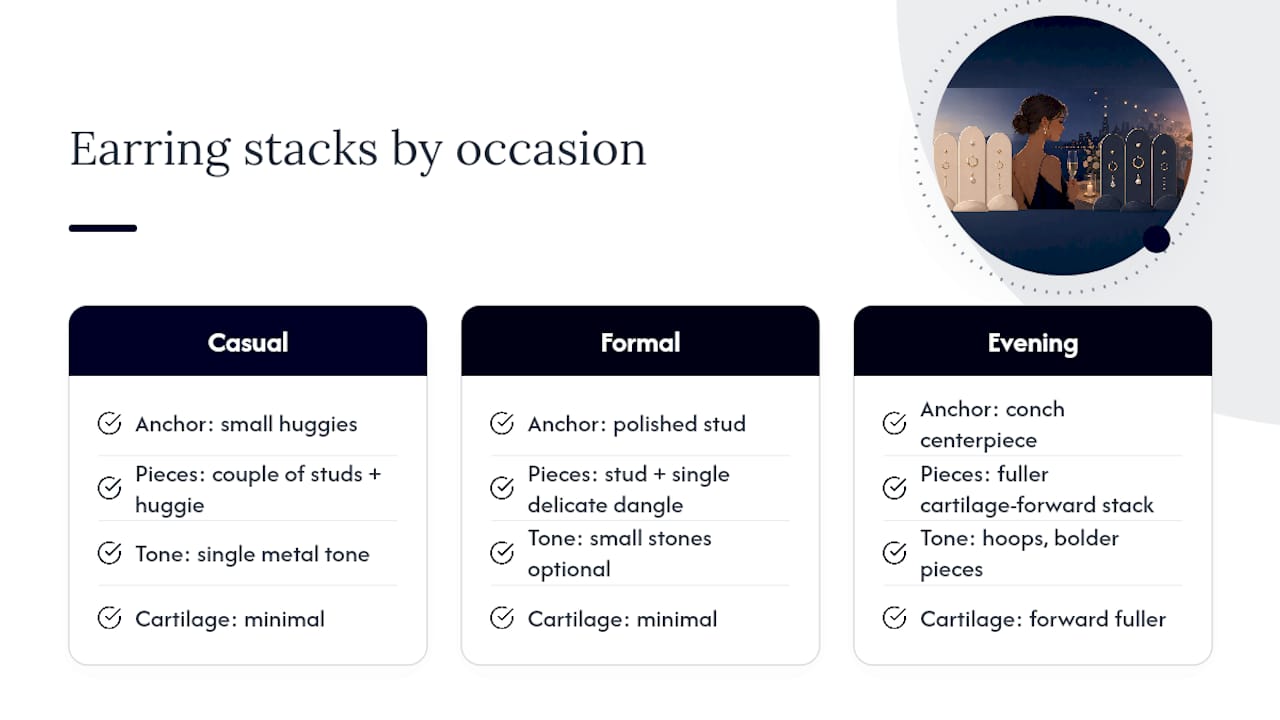
For casual, everyday wear, lean into the minimal or balanced trio approach: small huggies, a couple of studs, one metal tone. It survives a full day of movement, phone calls, and pulling on sweaters without catching. For formal occasions, a slightly more polished version of the same stack works better than adding pieces. Swap a plain stud for one with a small stone, or add a single delicate dangle at the lobe while keeping the cartilage minimal so nothing competes with an updo or a statement necklace.
Edgier, going-out looks are where the conch centerpiece or a fuller cartilage-forward stack earns its keep. Hoops read bolder under evening light, and you can afford a slightly busier composition when the rest of the look (makeup, outfit) is already turned up. The rule that holds across all three settings: the anchor and gradient logic doesn’t change, only the boldness of the pieces you slot into it. A wedding version of your everyday stack might just mean swapping gold studs for ones with tiny diamonds, same placements, same proportions.
What I’ve Learned Building My Own Ear Stack
Here’s my honest three-step check every morning, and it takes about ten seconds. First, is the anchor piece visible and clearly the biggest thing on my ear? If a smaller piece has somehow become the focal point, the whole stack reads wrong. Second, does the proportion feel harmonious as my eye moves upward, or is there a jump where one piece is oddly bigger than the one below it? Third, are the backs secure and comfortable, because a stack that pinches by noon isn’t a stack you’ll actually keep wearing.
I’ve written before about treating an anchor as the foundation for ring stacking too, and the logic carries over almost exactly. What surprises people most is how much negative space matters. The instinct when you love earrings is to keep adding, but the stacks that photograph well and wear well almost always have less in them than you’d expect. Let your ear evolve slowly. Some of the best combinations I’ve landed on took months of small swaps, not one big shopping trip.
— Georgia
Where to Find Curated Starter Pieces
The approach this whole article argues for is an intentional, curated selection rather than a pile of options that leaves you guessing what actually works together. Every piece matters when a stud or huggie is going to sit against your skin every day for years, not just for a season.
If you’re starting from zero, the Jewelry & Elevated Accessories collection is the easiest place to find anchor pieces and smaller cartilage studs in the same visit. For readers building a single-metal-tone stack, as this guide recommends, the Everyday Gold Jewellery collection keeps every piece in one cohesive tone, so you’re not stuck matching finishes across five different retailers. Browse the gold collection, pick your anchor stud or huggie first, and build outward from there over the next few months rather than all at once.
Sources
- Curated Ear Ideas: Stylish Ways to Build Your Perfect Ear Stack | PiercingMag
- Tiny studs make a polished curated ear, built for layering | Prism News
- Earring Piercings For Minimalists: How To Curate A Subtle Ear Stack - Thirstyle
FAQ
What Is the 2/3 Earring Rule?
It’s shorthand for the idea that two pieces per ear reads as minimal while three reads as visually curated without looking cluttered. Beyond three, you need real scale discipline or the stack starts to look busy rather than styled.
How Do You Make a Good Earring Stack?
Start with one anchor piece at the lobe, then add pieces that get smaller as you move up the ear, keeping a consistent metal tone throughout. Leave visible space between each piece so the composition reads as intentional rather than crowded.
What Are Some Cool Earring Stack Ideas to Try?
A balanced trio (huggie, small stud, tiny flat-back), a soft stacked-lobe look with two or three lobe piercings, and a bolder conch centerpiece paired with simple lobe studs are three distinct directions worth trying. Diamondsbydaisy’s Jewelry & Elevated Accessories collection has pieces sized for each version.
How Can I Style My Earring Stack for Different Looks?
Keep the same anchor-and-gradient logic for casual, formal, and edgier looks, and change only the boldness of the individual pieces. Swap a plain stud for one with a stone for formal wear, or add a hoop centerpiece for a going-out look, without abandoning the proportions that made the stack work in the first place.