

How to Choose the Right Diamond Carat Weight
Table of Contents
- Step 1: Understand Diamond Carat Weight vs. Diamond Size
- Step 2: Use a Diamond Carat Size Chart to Visualize Your Options
- Step 3: Diamond Cut vs Carat Weight: Why Cut Quality Matters More
- Step 4: Balance the 4 Cs for Maximum Visual Impact
- Step 5: How to Save Money on Diamond Carat Without Compromising Beauty
- Step 6: Consider Finger Size and Resale Value
- Frequently Asked Questions
Last Updated: September 10, 2026
Step 1: Understand Diamond Carat Weight vs. Diamond Size
Diamond carat weight is the standard unit used to measure a diamond's mass, with one carat equal to 200 milligrams (gia.edu). Carat weight measures how heavy a diamond is, not how large it appears. Two diamonds of identical carat weight can look dramatically different depending on how the weight is distributed. A well-cut diamond directs light upward through the table, creating the illusion of greater size. A poorly cut stone of the same weight can appear smaller because its mass sits in the girdle rather than the crown. This is why understanding carat weight as a measure of mass, not millimetre width, is the foundation of every decision that follows.
Millimeter Measurements and Surface Area
Millimetre measurements and surface area determine how large a diamond actually looks on the hand. A one-carat round brilliant typically measures around 6.5mm across, but the same carat weight in a different shape can span 7mm or more. The surface area, not the weight, is what your eye reads as size.
Step 2: Use a Diamond Carat Size Chart to Visualize Your Options
A diamond carat size chart converts carat weight into millimetre measurements so you can see how different weights translate to visual spread before committing to a purchase. These charts are the most practical tool available for comparing options, because they bridge the gap between the abstract number on a certificate and the physical stone you will wear.
The chart below shows approximate measurements for round brilliant diamonds, the most common shape:
| Carat Weight | Approximate Diameter | Visual Impression |
|---|---|---|
| 0.50ct | 5.1mm | Delicate, subtle |
| 0.75ct | 5.8mm | Noticeable presence |
| 1.00ct | 6.5mm | Classic, substantial |
| 1.50ct | 7.4mm | Bold, eye-catching |
| 2.00ct | 8.1mm | Dramatic, statement |
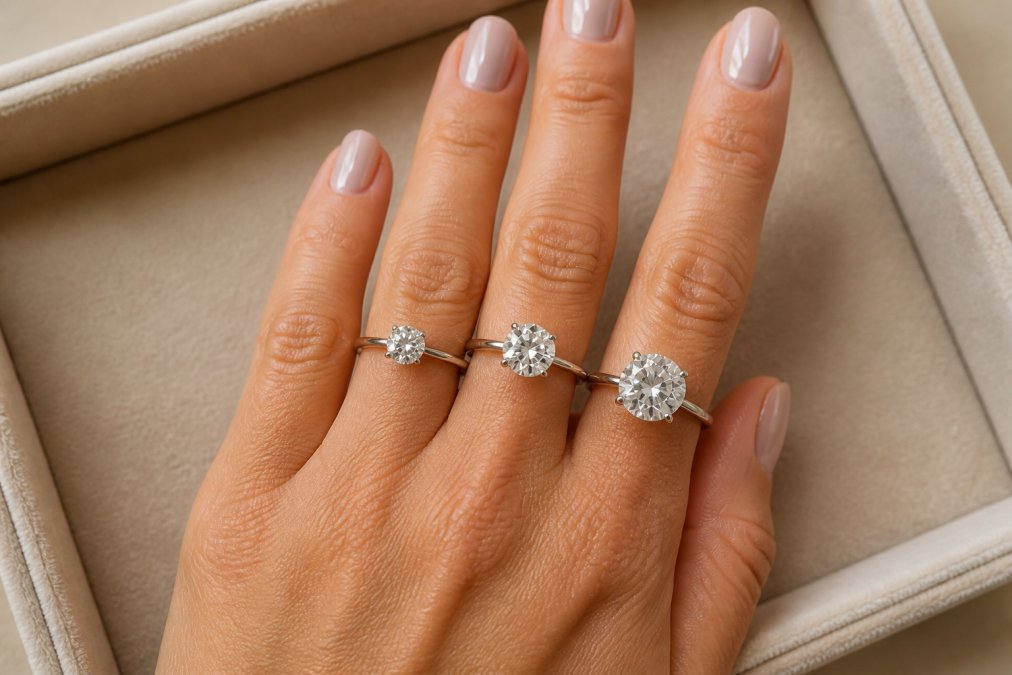
Why the Same Carat Weight Looks Different in Every Shape
Carat weight is a measure of mass, not spread, so the same 1.00ct stone can occupy very different amounts of space depending on its cut. A round brilliant concentrates its weight toward the centre and typically measures around 6.5mm across. An elongated shape such as a marquise, pear, or oval spreads that same mass over a longer surface, so a 1.00ct pear or marquise can span 8mm or more from tip to tip while appearing narrower side to side. A cushion or princess cut often measures slightly smaller across than a round of the same weight because more of the mass sits beneath the table. This is why comparing carat weights across shapes without checking millimetres is misleading: a 0.90ct oval can look larger on the hand than a 1.00ct round.
How Finger Size Changes What the Chart Means
A carat size chart tells you the spread of the stone, not how large it will look on a specific hand. The same 1.00ct round covers a much greater proportion of a slender finger than a wider one, because the eye reads the ratio of stone width to finger width rather than the stone in isolation. As a rough guide, a 1.00ct round on a narrow finger can cover close to half the visible width of the finger, while on a broader finger the same stone may cover closer to a third. This is the single most personalised variable in the whole decision, and most charts ignore it entirely. Before you settle on a weight, try on rings in your own finger size rather than judging from a photograph on someone else's hand.
Reading the Chart Like a Buyer, Not a Browser
When you look at a chart, work in millimetres and in steps of roughly 0.25mm, because that is the increment at which the eye starts to register a difference in spread. A jump of 0.10ct to 0.15ct in the middle of the range often produces less than 0.2mm of extra diameter, which is very hard to see once the ring is on the hand. The practical implication is that small carat increases cost real money while delivering almost no visible change, whereas moving up a full shape or a different cut can change the perceived size far more. Use the chart to find the millimetre spread you actually want, then work backwards to the carat weight and shape that deliver it.
The jump from 0.9ct to 1.0ct often costs disproportionately more than the jump from 0.8ct to 0.9ct, yet the visual difference is nearly imperceptible. The Gemological Institute of America's diamond grading documentation explains that cut quality, not carat weight alone, determines how light performs within the stone.
Step 3: Diamond Cut vs Carat Weight: Why Cut Quality Matters More
Diamond cut vs carat weight is not a competition, but if you must prioritise one, cut quality wins every time. A diamond's cut grade determines how effectively it reflects light, creating the brilliance, fire, and scintillation that make a stone captivating. A larger diamond with a poor cut will appear dull and lifeless, while a smaller diamond with an excellent cut can outshine it dramatically.
The GIA's diamond cut grading system evaluates cut on seven factors including brightness, fire, and scintillation. Stones graded "Excellent" or "Very Good" command a premium, but that premium delivers visible returns. A common mistake is sacrificing cut grade to afford a higher carat weight, resulting in a stone that looks flat despite its size.
Step 4: Balance the 4 Cs for Maximum Visual Impact
Balancing the 4 Cs, cut, colour, clarity, and carat, means understanding which trade-offs deliver the greatest visual return for your budget. The conventional approach treats all four as equally important, but in practice, they are not.
- Cut: Never compromise. This is the only C that directly controls how light behaves in the stone.
- Colour: Near-colourless grades (G to J) offer excellent value. The difference between D and G is invisible to the naked eye in most settings.
- Clarity: VS1 to SI1 clarity grades are typically eye-clean. Inclusions at these grades are microscopic.
- Carat: Adjust this last. Once cut, colour, and clarity are optimised, allocate remaining budget to carat.
How Setting Style Affects Perceived Size
Setting style affects perceived size more than most buyers realise. A halo setting surrounds the centre stone with smaller diamonds, creating the impression of a significantly larger diamond. A solitaire setting, by contrast, presents the centre stone without distraction, making its actual size the focal point. Bezel settings can make a diamond appear slightly smaller because the metal rim covers the girdle. For those wanting maximum visual impact from a modest carat weight, a halo setting is the most effective choice.
Step 5: How to Save Money on Diamond Carat Without Compromising Beauty
Learning how to save money on diamond carat without compromising beauty comes down to three strategies: choosing slightly below magic sizes, accepting near-colourless grades, and prioritising cut over weight. These approaches preserve visual quality while reducing cost significantly.
Magic Sizes and Price Per Carat
Magic sizes are the round carat weights, 0.50ct, 0.75ct, 1.00ct, 1.50ct, and 2.00ct, that trigger disproportionate price increases. A 0.95ct diamond typically costs noticeably less than a 1.00ct stone of identical quality, yet the size difference is invisible. Price per carat rises exponentially at these thresholds because demand concentrates there. Shopping just below a magic size is one of the most effective ways to maximise value.
Step 6: Consider Finger Size and Resale Value
Finger size and carat proportion matter more than most buyers expect, and this is the area where generic guides fall shortest. A 1.00ct diamond on a size H finger looks substantially larger than the same stone on a size N finger, because the eye judges the stone against the width of the finger beneath it. Proportion, not carat weight alone, is what the eye actually reads.
The Visual Ratio: Stone Width Against Finger Width
A useful way to think about this is as a ratio: the width of the diamond divided by the visible width of the finger. A ratio somewhere between one-third and one-half of the finger width often reads as a well-proportioned, substantial ring, while a stone that covers more than about two-thirds of the finger width can start to look oversized for everyday wear. Because finger widths vary considerably between individuals, the same carat weight can sit at opposite ends of that range on two different hands. If you have slender fingers, a modest carat weight delivers impressive presence; on broader fingers, a slightly higher carat weight maintains visual balance. This is why trying a ring on your own hand, in your own size, beats any photograph or chart.
How Setting Style Cheats the Eye
Setting style affects perceived size more than most buyers realise, and it is the most reliable way to get a larger look without paying for a larger stone. A halo setting surrounds the centre stone with a ring of smaller diamonds, creating the impression of a significantly larger centre stone; the effect can be substantial, often making a modest centre appear closer to the next carat weight up. A solitaire setting presents the centre stone without distraction, so its actual size is the focal point and nothing inflates it. A bezel setting wraps a metal rim around the girdle, which can make a diamond appear slightly smaller because the metal covers part of the stone's edge. A three-stone or side-stone setting extends the visual footprint across the finger, which reads as a wider, more generous ring even when the centre stone is modest. For those wanting maximum visual impact from a lower carat weight, a halo or side-stone design is usually the most effective choice, and the saving can be redirected into a better cut grade.
Resale Value and the Magic-Weight Question
Resale value implications are worth understanding before you buy, particularly if you are weighing a stone just below a magic size against one exactly on it. Mined diamonds typically resell for a fraction of their retail price, because the retail margin, tax, and certification costs are not recovered on the secondary market. Lab-grown diamonds have seen significant price declines as production scales, which has made their resale position weaker still. Within the mined market, liquidity tends to concentrate at the round, well-known weights, because that is where buyer demand clusters; a 0.95ct stone may cost noticeably less than a 1.00ct stone of identical quality, but it can also be slower to sell later for the same reason. If resale value matters to you, focus on certified stones with excellent cut grades from recognised laboratories, keep the original certificate and receipt, and accept that the emotional value of the piece will usually outweigh any resale consideration for most buyers.
Frequently Asked Questions
What is a good carat weight for a diamond?
A good carat weight depends on your budget and personal style. For engagement rings, 0.5 to 1.5 carats is common. A 1 carat diamond offers a classic look, while 2 carats makes a bolder statement. Consider finger size and setting style. A halo setting can make a 0.75 carat stone appear larger. Focus on cut quality first, then choose the carat weight that fits your budget without sacrificing brilliance.
Does a higher carat weight always mean a larger looking diamond?
No. Carat weight measures mass, not visual size. A poorly cut 1.5 carat diamond can look smaller than a well-cut 1 carat stone because much of its weight hides in the girdle. Diamond shape also matters: an elongated oval or marquise spreads its weight across a larger surface area. Always compare millimeter measurements and visual spread, not just carat weight, when judging how large a diamond appears.
How does diamond cut affect the appearance of carat weight?
Cut quality determines how much light a diamond reflects, which directly impacts its perceived size and brilliance. A well-proportioned diamond with excellent symmetry and polish will appear larger and more sparkling than a poorly cut stone of the same carat weight. Prioritise cut grade over carat weight. A 0.9 carat diamond with an excellent cut often looks more impressive than a 1.1 carat diamond with a fair cut.
How do I balance budget with diamond carat size?
Start by setting your total budget, then allocate roughly 50-60% to carat weight, 20-25% to cut, and the remainder to colour and clarity. Consider magic sizes: just below common weights like 0.90 or 1.40 carats, prices drop noticeably without a visible size difference. Lab-grown diamonds offer similar size for less. A slightly lower clarity grade like VS2 can also free up budget for a larger carat weight.
Choosing the right diamond carat weight involves balancing visual impact against budget while never compromising on cut quality. At Diamonds by daisy, we handpick every gemstone and precious metal to ensure each piece meets our standard of refined elegance, backed by a 30-day satisfaction guarantee for complete peace of mind. Explore our curated collection and find the piece that captures your unique brilliance. Add to cart with confidence.